29 May How To Create a Login User in Alarm.com
In this blog post, we will guide you through the process of how to create a login user on Alarm.com. Alarm.com is a leading platform for security and home automation, providing users with remote access to their security systems, smart home devices, and video monitoring. Whether you’re a homeowner looking to protect your property or a business owner aiming to secure your premises, Alarm.com offers robust solutions tailored to your needs. Zions Security Alarms, an authorized dealer for Alarm.com, brings years of expertise in installing and configuring Alarm.com devices, ensuring that your security system is set up correctly and efficiently.
With the professional installation and support from Zions Security Alarms, you can rest assured that your Alarm.com system will function optimally, providing seamless and secure access to your home or business. Creating a login user on Alarm.com is a straightforward process, but it’s essential to follow the steps carefully to ensure that your account is set up correctly and securely. There is no limit to the number of logins that can be created. For information about creating a login for an Enterprise group, see Create a new group login.
Note: Only logins with Master Control permissions can create new logins. For further assistance, contact the account administrator.
Step-by-Step Guide to Creating a Login User on Alarm.com
To create a new login:
- Log into the customer website.
- Click Users.
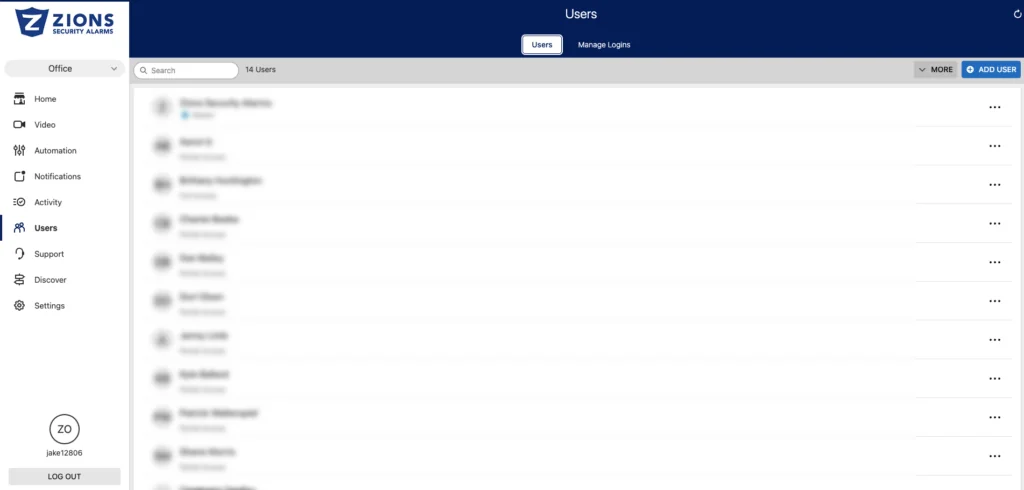
- Click Manage Logins.

- Click Add a Login.
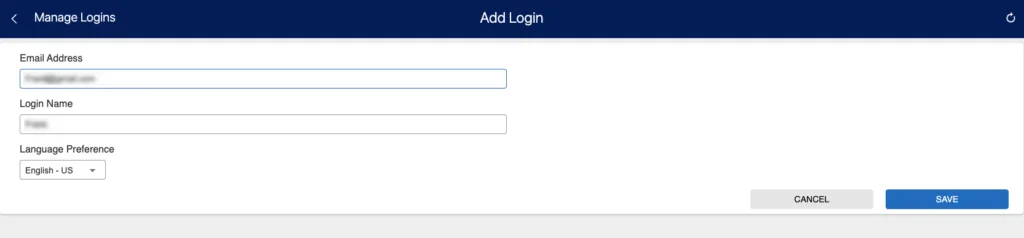
- In the Email Address field, enter the new login’s email address.
- In the Login Name field, enter the desired login name.
- Using the Language Preference dropdown menu, select the desired language preference.
- Click Save.
- On the Manage Login Permissions page, select either Master Control, Full Control, Read Only, Limited Device Access, or Custom. This will give the login permission to access various website features. For a description of each permission, see Permissions.
- If no permissions are selected and saved:
- On the customer website, the login is able to view only the welcome card, sensors, and activity. The login is not able to perform any changes except to their Login Information.
- On the customer app, the login is able to view only trouble alerts, weather, and history. The login is not able to perform any changes except to their App Settings.
- If no permissions are selected and saved:
- Click Save.


You can follow our YouTube tutorial right here. If you need to see how to create keypad users you can learn more here.
Note: New logins receive an email containing their login name, a link to set up a new password, and a link to download the customer app. If this email is not being received, confirm the email address for the new login is entered correctly and/or have the user check their junk/spam folder.
No Comments