27 Jan ADT Command Panel: An Introduction
Welcome to your new ADT Command Panel
Congratulations on your new ADT Command panel. In this post, we aim to help you, a new user of the ADT Command Panel, get acquainted with the fundamentals of the panel. Perhaps you’re not tech savvy and came here to figure out how to use your new product. Maybe you’ve already explored it and just want to check in to make sure you aren’t missing anything important. Either way, we will help start you off on the right foot. (By the way, if you don’t have ADT security yet, and you’d like to change that, reach out to us!)
Getting Started
The main screen is called your home screen. Understanding it is your starting point for using your Command Panel.
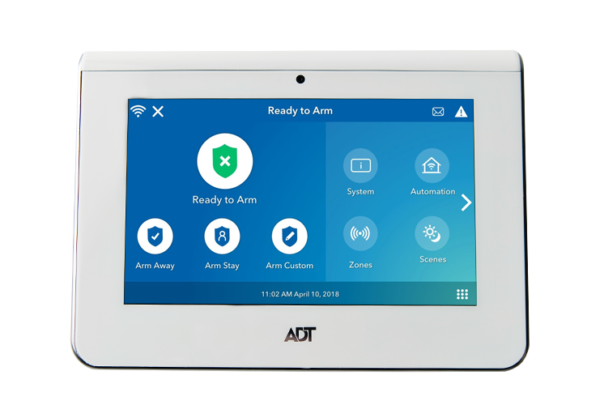
The large green shield icon on the left-hand side shows your current system status.
The three icons under the large green shield show your different arming options. Tap them when you want to change your system status. Each arming option lets you do different things.
Arming options
For example, to “Arm Away” arms the whole system, including interior motion sensors. Use this when you are not planning on anyone being home.
When you’re at home for the evening, use “Arm Stay,” which only arms the parts of the system that will not go off if you are walking around the house; it does not arm the interior motion sensors but will arm the entrance alarms.
But you might want something in between. For those occasions, use “Arm Custom,” which lets you arm most of the system while excepting certain zones. You might use this if you wanted to leave a window open without movement from the breeze activating the motion sensors in that area.
Additional Settings
Now, let’s take a look at the other settings that help you operate and get the most out of your ADT Command Panel.
On the right of your home screen, notice icons for controlling the Zones, Scenes, and Automation features of your system.
Then, on the top left-hand corner, you will see a Wi-Fi signal—in case you’re unfamiliar with its appearance, it looks something like a fan. It will show you the strength of your connection to your wireless internet. If you tap on it, you will find more information about your Wi-Fi settings. To return to the home screen from the Wi-Fi settings, use the back arrow on the right.
Next to the Wi-Fi icon, you’ll find the Messages icon shaped like an envelope. Tap it to find messages from ADT. As with the Wi-Fi settings page, use the back arrow to return to the home screen.
In the top right corner of the home screen, you can see the emergency panic buttons. Tap there in case of emergency. The system will prompt you to tap Fire, Police, or Personal; make a selection according to the nature of your emergency. Then, ADT monitoring professionals and emergency personnel will be contacted based on your selection. Again, to return to the home screen, press the back arrow on the right.
To complete our tour, on the home screen, tap the arrow to the right for more options. There, for tool features, tap Tools. Before you access tools, the panel will prompt you to enter your passcode. From the tools screen, you can manage your Wi-Fi settings, users, and other settings both general and advanced. To get back to the home screen this time, tap the back arrow at the bottom of the screen in the left corner.
Questions?
Thank you for reading today! We hope you found this introduction helpful because we aim to support you in keeping your family safe. Furthermore, if you still have questions or want to reach out to us about something else, contact us here. Enjoy your new system.
Please check out our YouTube Channel for more information.
No Comments