Shop
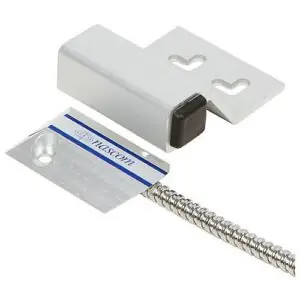
Overhead Door Mini Switch with Universal Magnet
$30.00
The Mighty Mite Combines The Installers’ Choice Of Contact Confi Guration With An N35 Ndfeb Magnet For Maximum Gap Performance.
The Closed Loop Versions Of The Overhead Door Mini Switch Prevent False Alarms Caused By The Side
To Side Shifting Of Overhead Doors With Our Unique NO DEAD SPOT™ Technology
Description
Product Overview
The Mighty Mite Combines The Installers’ Choice Of Contact Confi Guration With An N35 Ndfeb Magnet For Maximum Gap Performance.
The Closed Loop Versions Of The Overhead Door Mini Switch Prevent False Alarms Caused By The Side
To Side Shifting Of Overhead Doors With Our Unique NO DEAD SPOT™ Technology
FEATURES
- NO DEAD SPOT™ TECHNOLOGY
- UNIVERSAL MOUNT
- EXTRA WIDE GAP – N35 NdFeB RARE EARTH MAGNET
- 36″ 22AWG WIRE LEADS
- 24″ ARMORED CABLE LEAD PROTECTION
- EXTRUDED ANODIZED (TYPE II) ALUMINUM
- LISTED TO UL634 STANDARD
Main Features
- 36” 22AWG wire leads
- 24″ Armored cable lead protection
- Extruded anodized (Type II) aluminum
- Contact Configuration N.O.
- Contact Resistance 150000 Micro Ohm
- Contact Resistance (Ohm) 0.15
- Lead Gauge 0.87″
- Lead Gauge (mm) 22
- Lead Length 36″
- Lead Length (mm) 914.4
- Magnet Type Permanent Magnet
- Mounting Type
- Overhead Recommended Use
- Door Standard Gap 2.75″
- Standard Gap (mm) 69.85
- Termination Style Wire Leads
INSTALLATION INSTRUCTIONS
The switch can be mounted on the floor at the base of the door or on the wall at the top of the door. For best performance, align the switch and magnet housings and keep the gap distance between the switch and magnet as close as possible. FLOOR MOUNT:
• With the overhead door closed, position the magnet on the lower right or left side of the door, then align the switch under the magnet. Adjust the position of the switch and magnet to ensure there is adequate clearance between the housings (1/4” minimum).
• Make sure the stainless steel armored cable will not interfere with the door operation.
• Mark the mounting hole locations for the switch and magnet.
• Drill the marked locations on the door using a high speed drill adequately sized for self-tapping screws or machine screws.
• Mount the magnet on the door.
• Raise the door and drill the switch mounting hole locations using a masonry bit for concrete floors, sized to fit expansion anchors for #6 self-tapping screws.
• Secure the switch to the floor.
• Test the switch by attaching an ohm meter to the switch leads and operate the door.
• Connect the leads to the alarm system conductors.
Please check out our YouTube Channel for more information.


Maria Mac –
Great product arrived on time!