24 Apr How to Configure Privacy Zones On Alarm.com Video Devices
In this blog post, we will give you the advantage of WHY! you should know HOW! to Configure Privacy Zones On Alarm.com Video Devices Privacy zones serve as virtual barriers within the camera’s field of view where recording is restricted. These zones are particularly useful for safeguarding sensitive areas such as neighboring properties, windows, or areas where privacy is a concern. By defining these zones, users can prevent their cameras from inadvertently capturing footage of areas they wish to keep private.
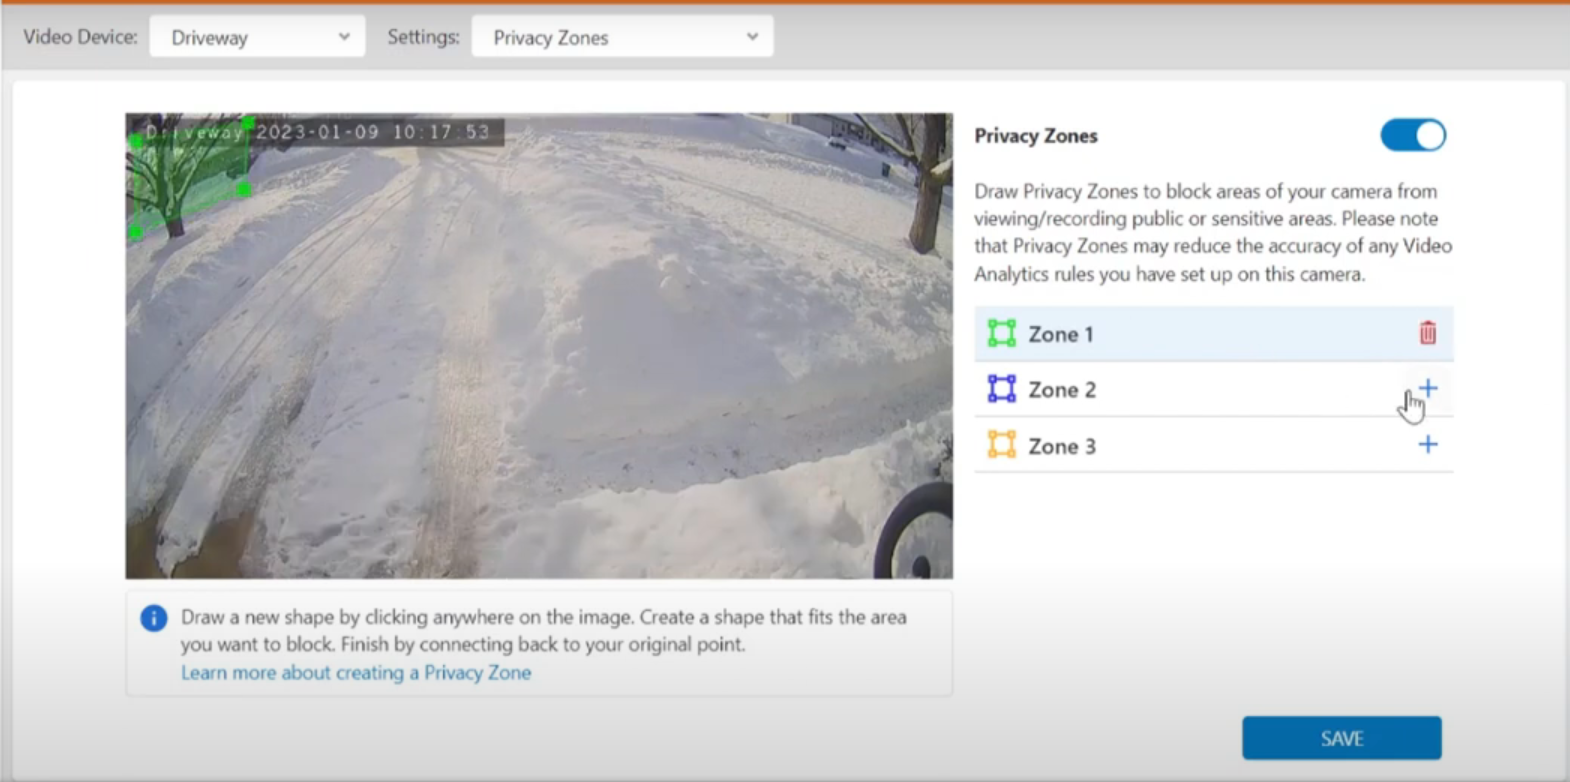
These zones appear as opaque, gray shapes covering the specified area, effectively blocking out any sensitive or private areas you wish to keep off-camera. Whether you’re viewing a Live Feed, accessing Saved Clips, reviewing 24/7 Onboard Recordings, or navigating SVR Timelines, these zones remain intact. The zones appear on the Alarm.com customer website and the Alarm.com app.
Alarm.com cameras that are compatible with privacy zones:
- ADT Control 1080P WiFi Indoor Camera
- ADT Control 1080P Wifi Outdoor Camera
- Alarm.com Pro 1080P Poe Dome Camera
- Alarm.com Pro 4MP Poe Varifocal Turret Camera
- Alarm.com Pro 4MP Poe Varifocal Bullet Camera
- Alarm.com 1080P Pro Poe Varifocal Dome Camera
- Alarm.com Pro 1080P PoE Audio Bullet Camera
Using Privacy Zones and Video Analytics together
Verify that Privacy Zones are not interfering with Video Analytics rules. For more information about Video Analytics, see Alarm.com Video Analytics here.
- Avoid overlapping a Privacy Zone with any configured Ground Zones and Tripwires.
- Create Privacy Zones that are as small as possible.
- Avoid the center of the camera’s field of view when setting up Privacy Zones.
- Calibrate video analytics before configuring Privacy Zones. Remove or disable Privacy Zones during re-calibration. For more information about calibration, see Calibrate a device for Video Analytics.
- Place the Privacy Zone away from the area of interest for better analytics performance. The closer the Privacy Zones are to the area of interest, the worse the analytics performance.
- Consider removing the Privacy Zone if video analytics performance is not satisfactory.
Privacy Zones can be configured using the Alarm.com app and Alarm.com customer website.
Here are the steps for Configure Privacy Zones On Alarm.com Video Devices:
- Login to your Alarm.com app
- Tap (Icon)

- Tap (Settings)

- Tap to select the desired camera
- Tap Video
- Tap Privacy Zones
- Tap on the desired zone to create a new shape
- Draw the desired shape of the Privacy Zone. Finish by connecting back to the original point
- Lastly, tap Save


 on the desired zone to create a new shape
Here are the steps for configuring your privacy zone using the Alarm.com customer website:
- Log into the Alarm.com customer website.
- Click Video
- Click Settings
- Click Privacy Zone

- Click the on the desired zone to create a new shape

- Draw the desired shape of the Privacy Zone. Finish by connecting back to the original point
- Click Save

Please take note of any existing Video Analytics Ground Zones and Tripwires, and avoid overlapping them with the Privacy Zones. It is recommended to create Privacy Zones before configuring any Video Analytics rules for the camera.
No Comments